Adhesives are used to assemble basic products from consumer products, construction, military, and medical industries to bonding thermo-protective tiles used on the space shuttle.
Selecting the proper adhesive is critical to assure reliability and performance of the product set forth. In this application note we will be comparing different adhesive bond strength. ASTM 1002 and DIN 1465 Standards have been created for Single Lap Shear Joint Tests for metals, fibers and plastics only to mention a few.
What is Required
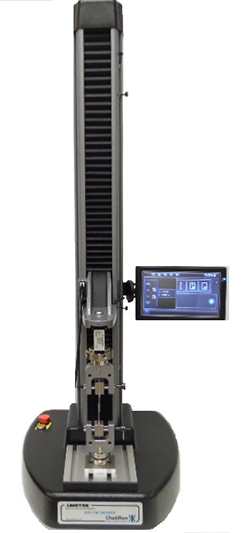
CS1100 Motorized Force Tester
The
CS1100 tester is well adapted in production and research development environments to perform lap shear tests.
With a small foot print the
CS1100 tester can easily be set on a table for inline production and research development testing. The
CS1100 tablet touch screen makes the task even easier for the user with only one touch of the finger to begin the lap shear test. The tester has been designed with quietness in mind which makes it the perfect solution in the lab environment where silence is at a premium.
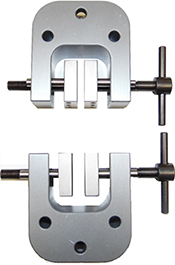 01/4234 Manual Tightening Grip
The manual tightening grips used for this test are 01/4234 (2500N rated) with 01/4244 (30 x 30mm) diamond faces.
Considerations have to be taken for the selection of the proper grips/adaptors. For the adhesive lap shear test, diamond serrated grip faces will be used to assure that the material of the grip faces is harder than the material being tested and that the grip face serration grit has correct grid size to avoid slippage.
For example, a serration too dense for the material will clog the serrations with residue and require constant cleaning leading to slippage. In the opposite situation, a serration with a grid too large may damage the sample.
Both of these scenarios have to be taken into account to find the appropriate grip faces. Make sure to
contact your Ametek Sales Representative for assistance when in doubt.
Sample Preparation per ASTM 1002 and DIN 1465
Proper sample preparation is critical to assure consistent lap shear test results. The total length of the sample may vary to accommodate the grips and tensile tester work area. The most critical is the surface area on which the strips will overlap and then be bonded together.
The 4 Steps of Preparation
Step 1 - Cleaning
Thoroughly clean your samples using a solvent before applying adhesive.
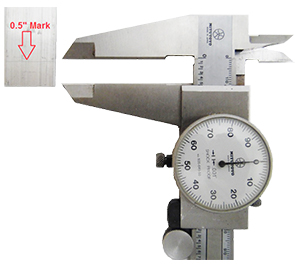
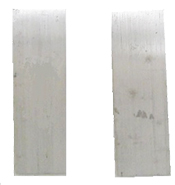 Step 2 - Marking Bond Areas
Score a line on the 1” (25mm) metal strip at 0.5” (12.5mm).
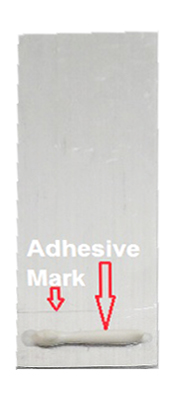
 Step 3 - Adhesive
Apply adhesive uniformly to the area so that the area is fully covered with adhesive after samples have been pressed together. Allow the adhesive to cure per manufacturer’s specifications.
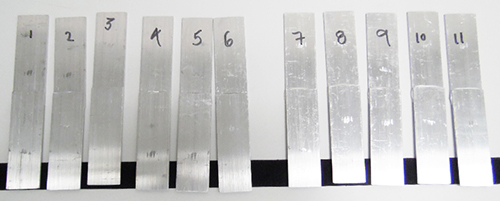
 Step 4 - Sample Identification
Label and keep your samples for analysis after testing. In this example samples have been identified as follows; #1-3 Cyanoacrylate, #4-6 gel adhesive, #7-9 Liquid nail caulk, #10-11 Seal and bond tile caulk.
 Description of Tests
The objective of this single lap shear joint adhesive test is to demonstrate the different behaviors of adhesives during and after a tensile test.
Peak load and extension parameters were recorded to determine maximum force and elongation of the different adhesives tested on the Chatillon CS1100.
The advantage of the 01/4234 grips is that they allow samples to be mounted with an offset.
Results from CS1100 Test Screens
When testing adhesives two types of failures exist:
- The adhesive fails within itself would be a coadhesive failure
- The adhesive separating from either side of the sample would be an adhesive failure

Test result for cyanoacrylate

Test result for goop / gel adhesive
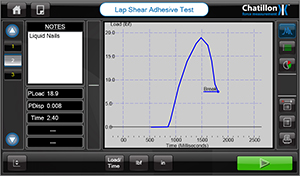
Test result for liquid nail caulk
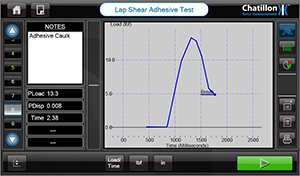
Test result for adhesive caulk
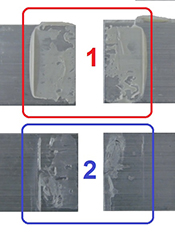
The samples 1 and 2 have both coadhesive failures which indicated that results gathered from both of these samples truly represent the tensile properties for these adhesives.
If adhesive remained on one side of the sample this could indicate poor preparation of the specimen, poor cleaning, incorrect adhesive gap, ambient temperature / humidity or improper curing time.
Note! This test follows guidelines from the ASTM 1002 and DIN 1465 and should be used for reference only.
Download this application note as PDF